RunHeddaWebRunner – Azure Data
Factory Setup Guide
This is a guide on how to setup a pipeline that uses the HEDDA.IO WebRunner function.
For more information about the Hedda WebRunner Function and what it does, visit the following URL.
Linked Services
We start by adding the corresponding LinkedServices, in our case it is one Azure Function and Data Lake Gen2.
- Open the Azure Data Factory Studio.
- Go to “Management” in the menu on the left side.
- Once the “Management” is open, find and click on “Linked Services”.
This is where we add our Linked Services.
Azure Function Linked Service
First, we’re going to add the Azure Function.
- Click on “+New”, a menu will open on the right.
- Click on the second tab on top that’s called “Compute”.
- Find the Azure Function and click on it.

A menu will open up in which you will need to provide information that will allow Azure Data Factory (ADF) to connect to the Azure Function.

Azure Function Azure Data Lake Storage Gen2
Now, we add the Data Lake Storage Gen2 Linked Service.
- Click on “+New”, a menu will open on the right.
- Find the Azure Data Lake Storage Gen2 and click on it.

A menu will open up in which you will need to provide information that will allow ADF to connect to the Data Lake Storage.
Pipeline
Now that we have setup Linked Services, we can move towards setting up the Pipeline.
Find the “Author” button on the menu on the very Left side of the screen, and click on it. This will open up the “Author” menu.
Right under “Factory Resources” you can see a Plus sign. This is where you create Pipelines, Datasets, Data Flows, and Power Queries.
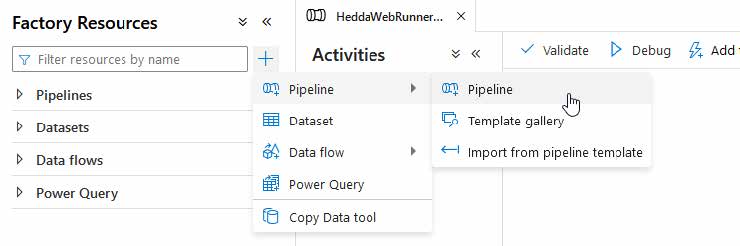
Hover over “Pipeline”, then click on “Pipeline” in the menu that opens, in order to create a new pipeline.
Parameters
Before we move to adding Activities, we will need to set up our parameters.
Because the Request Body would take quite a bit longer to modify, we decided to use pipeline parameters in order to make the process faster.
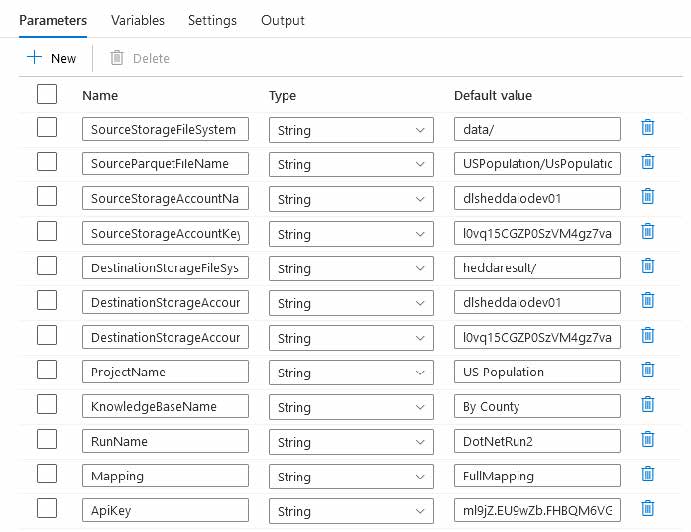
All the properties you see on the screen above represent each of the properties in the Request Body.
Create each of these variables, set their data type to String, and add a Default Value.
Variables
Further into the Pipeline, we will need to execute another Pipeline, however, we will need to pass in some information. In this case we will need to pass in the name of the folder in which the files were saved by the Azure Function.
We will create a variable for that, store the part of the function output that we’re interested in, and then pass the variable to the Execute Pipeline activity.

Activities
There are four activities in this pipeline.
- Azure Function
- Web
- Set Variable
- Execute Pipeline
We move to the Activities panel.
Find the “Search Activities” input field and look for Azure Function. When found, drag and drop it on the Pipeline canvas.
Azure Function Activity
Click the “Azure Function” in the Pipeline canvas.
Just below the Pipeline canvas, is a so called Activity Inspector, where you can configure your Activity.
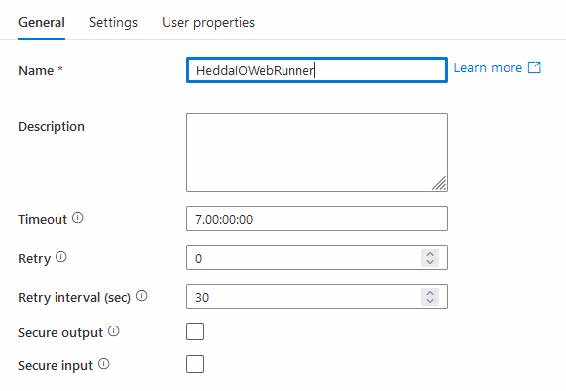
Enter a name, a description, and more.
The second tab, “Settings” is the one we’re more interested in.
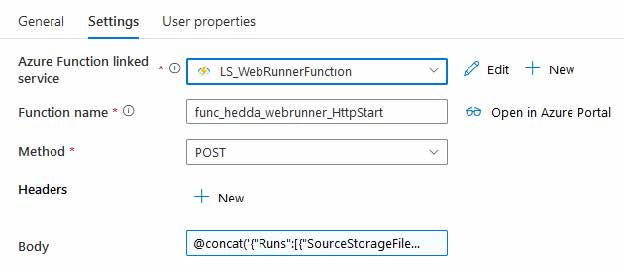
- Here, we get to select the Linked Service that we set up earlier, with the help of which, the Activity can access the data on the Data Lake.
- Next is the Function name, which you can check by clicking on “Open in Azure Portal” button on the left. It will open a new browser tab with the Azure Function resource, where you can control the Function, and which contains a lot of information, including the name of the Function/s.
In our case, we’re interested in the function “func_hedda_webrunner_HttpStart”. - Choose a Method, in our case we want to select “Post”.
- In the Body input, add the Body of the request that will be sent to the function. All the required details about the Request Body can be found [Here]. (https://dev.azure.com/oh22devops/HEDDA.IO/_wiki/wikis/HEDDA.IO.wiki/1484/HeddaIO-WebRunner- Function-Documentation).
- However, in this case, we replace the property values in the JSON Request Body with the Variables we’ve created earlier. We do that by means of concatenation as dynamic content.
Here’s how our dynamic content should look if you’re using the same variable names we used in this guide.
@concat(‘{“Runs”:[{“SourceStorageFileSystem”:”‘, pipeline().parameters.SourceStorageFileSystem,'”,”SourcePa
Web Activity
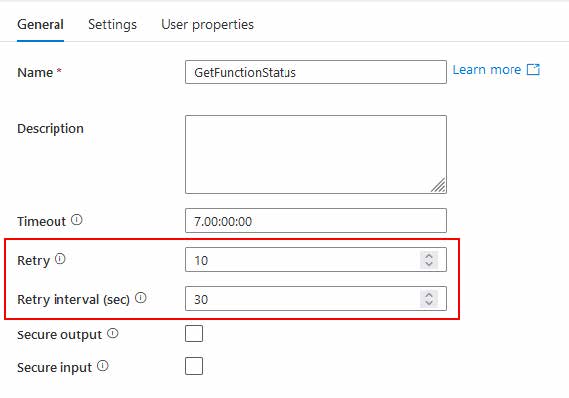
We already know that the output of our Azure Function call will produce the “statusQueryGetUri” which we can check with a simple Web call. Using the retry functionality of this activity, we can let it do calls every 30 seconds minimum, until the status of the function hits “Complete”.
Find the Web activity in the activity browser, drag it onto the canvas and connect the Azure Function to it.
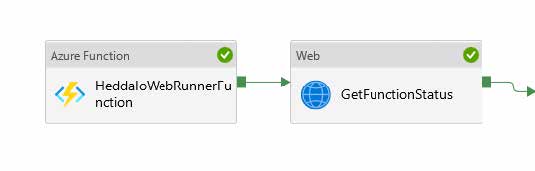
We configure the Web activity to execute a GET method on the statusQueryGetUri, which is part of the output returned by sending a request to the orchestrator, what we are doing in the previous activity.
Here’s the dynamic content that we will use: @activity(‘{AzureFunctionActivityName}’).output.statusQueryGetUri.
To do that, simply click on the “Add Dynamic Content” right below the URL input, when you click on the Input.

{AzureFunctionActivityName} – This should be replaced with the name of the Azure Function Activity in your Pipeline canvas.
The Web activity will retry the call until it gets a “Complete”, “Failed”, or “Timeout” status.
Here’s how the output returned by this activity should look:
{
“name”: “func_hedda_webrunner”,
“instanceId”: “e55d1ae2d30f4b7ea8668afb3c8efa2e”,
“runtimeStatus”: “Completed”,
“input”: {
“Runs”: [ {
} ]},
“customStatus”: null,
“output”: [
{
“ExecutionId”: “6f20b9c4-4755-4119-bfaa-6324710121c2”,
“StatisticsUrl”: “https://app-hediov2-api-dev.azurewebsites.net//statistic.html?projectId=2772
“DestinationStorageUrl”: “https://dlsheddaiodev01.blob.core.windows.net/heddaresult/US%20Popul
} ],
“createdTime”: “2022-06-22T14:14:56Z”,
“lastUpdatedTime”: “2022-06-22T14:14:59Z”,
“ADFWebActivityResponseHeaders”: {
“Request-Context”: “appId=cid-v1:5611b35d-d6c7-4e1b-97dd-9f8aca863365”,
“Date”: “Wed, 22 Jun 2022 14:15:00 GMT”,
“Content-Length”: “1474”,
“Content-Type”: “application/json; charset=utf-8”
},
“effectiveIntegrationRuntime”: “AutoResolveIntegrationRuntime (West Europe)”,
“executionDuration”: 0,
“durationInQueue”: {
“integrationRuntimeQueue”: 1
},
“billingReference”: {
“activityType”: “ExternalActivity”,
“billableDuration”: [
{
“meterType”: “AzureIR”,
“duration”: 0.016666666666666666,
“unit”: “Hours”
} ]} }
Set Variable
With this activity, we want to assign part of one of the outputs of the Azure Function (DestinationStorageUrl) to our DestinationFileFolder variable.
Find the Web activity in the activity browser and drag it onto the canvas. Connect the Web activity to it.

Click the activity to configure it.
- In the “General” tab, we add the name and the description for the activity.
- In the “Variables” tab we select the variable we want to set using the upper field, and then assign the value using Dynamic Content.
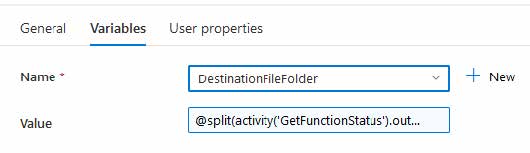
The following formula needs to be added. It will separate the value by the “/”, and store each into an array, then will select the item with index 7 from the array.
@split(activity(‘GetFunctionStatus’).output.Output[0].DestinationStorageUrl, ‘/’)[7]
Execute Pipeline
In order to store the values in our saved parquet files to Azure Database, we create another pipeline, that will be triggered in the current one.
Click here in order to see the guide on how to create the other pipeline.
Now that the other pipeline has been created, we are ready to execute it from here.
Find the “Execute Pipeline” in the activity browser, drag it to the canvas, and connect it to the sequence of activities, at the right end.

- In the “General” tab, we add the name and the description for the activity.
- In the “Settings” tab we select the pipeline that we want to invoke (this is the second pipeline that we have already created), selecting the pipeline will display the parameters that the pipeline is accepting.
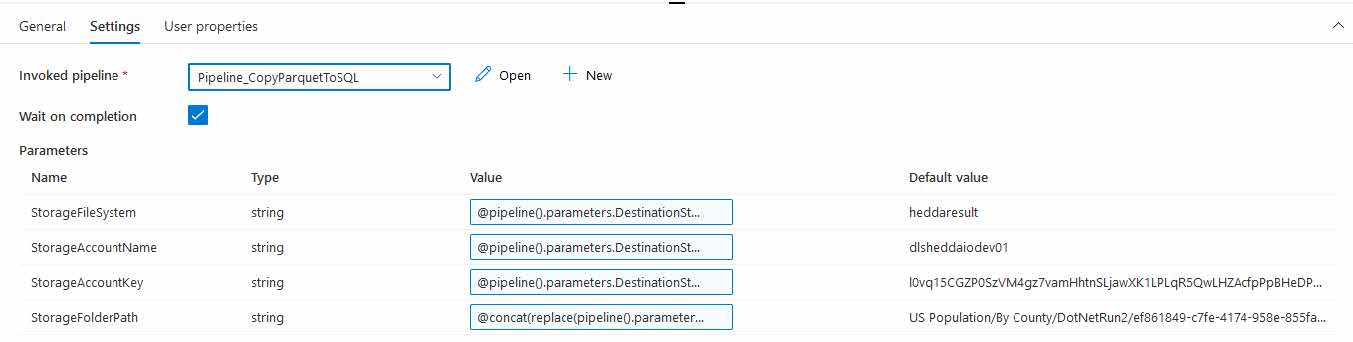
We should have the following parameters with their respective dynamic content:
- StorageFileSystem
@pipeline().parameters.DestinationStorageFileSystem - StorageAccountName
@pipeline().parameters.DestinationStorageAccountName - StorageAccountKey
@pipeline().parameters.DestinationStorageAccountKey - StorageFolderPath
@concat(replace(pipeline().parameters.ProjectName, ‘%20’, ‘ ‘), ‘/’,
replace(pipeline().parameters.KnowledgeBaseName, ‘%20’, ‘ ‘), ‘/’,
replace(pipeline().parameters.RunName, ‘%20’, ‘ ‘), ‘/’, variables(‘DestinationFileFolder’))
In StorageFolderPath, we are using some parameters and our variable, to concatenate and create the folder path to the Files.